Kenny Rogers Manager User's Manual
Last edited: December 15, 2003 08:09 AM
TABLE OF CONTENTS
Transactions (Deposits, Paid In/Out, Gift Certificate Sales/Redeemed and Credit Card Settlements)
General Ledger Account Maintenance
Assigning General Ledger Accounts
Overview
The user interface employed by this program is intended to closely resemble the techniques used by many other popular interfaces on the commercial software market. The following will describe the most common points of the interface.
Mouse Usage
At this time, the interface does not respond to Mouse input. This will be a feature that will come later.
Dialogs
A Dialog is a Window that contains various kinds of controls. These controls allow for the viewing and changing of information.
Only one control can have the focus at a time. The focus determines where the keyboard input will be directed. For example, in a dialog with several fields for editing, the focus will be highlighted and a cursor will flash by the text. Typing on the keyboard will cause that control to receive the input.
Pressing the TAB or BACKTAB key will move the focus forward or backward through the dialog. It is always apparent where the focus is, due to the change in color of the controls. Also, the focus can often be directed to a control by using the control's Hotkey. If a control has a hotkey, it is usually marked by a highlighted letter. Pressing Alt and the hotkey letter will activate the control.
The Up/Down keys will move the focus unless the current item is a List-Box.
The Left/Right arrows will move the focus unless the current item is an edit control.
Common Hotkeys
In most dialogs, there are hotkeys which will always be used. They are:
ESC - Quit / Close / Ok
INS - Insert or Add
ENTER - Edit (such as items in a list)
DEL - Delete
Button Control
A button control is used to invoke another function, such as to ADD or DELETE items from a list. A Button can be triggered by a hotkey, or by tabbing to the button and pressing Enter.
Check Box Control
A Check box is used to enable or disable an option. To toggle a check box, the hotkey may be pressed. It can also be selected by tabbing to the check box, and pressing space. While the check box has the focus, pressing Y will check the box, and N will un-check it. This is useful for keyboard macros.
Radio Button Control
A Radio button behaves like a check box, except that only one button may be enabled in a group. They are recognized as a diamond shape with a Dot in the middle for the enabled state.
List Box Control
A List box contains a scrollable list of items. Only one item in the box may be selected at once. While the list box has the focus, cursor keys move the highlight, and A-Z will perform speed-search functions.
Edit Control
An edit control allows the changing of a field value. Usually text or numbers may be entered in a free-form fashion.
Combo Control
A Combo control is a combination Edit and List box. It combines some of the two control features. When not activated, it appears like an Edit control, displaying the current selection. When activated, a pull-down list appears, showing the available options. At this point, it will function like a list-box. Pressing Enter will fold the list back up, and display the selected item.
To pull the list down, the hotkey may be pressed. Another way is to Tab to the control and press Enter or Space.
Another way to pull the list down, is to tab to the list, then begin to type the first couple of letters of the item you wish to select. This will invoke the speed-search facility of the list-box.
Kenny Rogers Manager is a specially designed reporting program for Kenny Rogers Roasters restaurants. It’s features are briefly explained here.
- A sales summary report which can be used as an "End of Day" report.
- A Roaster production report which can be used to facilitate the roasting procedure, ensuring that a proper quantity of product will be available for sale.
- A Sides production report that can be used to produce the proper quantity of side dishes each day.
- An Export to Accounting function which can be used to export critical information into a third party Accounting software program.
- A Purchases Log that can be used to collect purchases information.

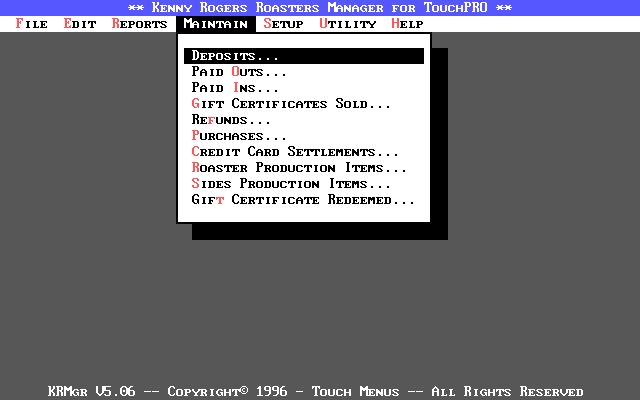
From the Maintenance Menu you can choose the following:
- Deposits - for entering cash deposits.
- Paid Outs - for entering paid outs.
- Paid Ins - for entering paid ins.
- Gift Certificates Sold - for entering gift certificate sales.
- Refunds - for entering refunds.
- Purchases – for entering purchases.
- Credit Card Settlements – for entering credit card settlements.
- Roaster Production Items - for maintaining a list of inventory items to be included on the Roaster Production report.
- Sides Production Items - for maintaining a list of inventory items to be included on the Sided Production report.
- Gift Certificates Redeemed – for entering gift certificates redeemed.
Overview
These transactions are transactions that do not affect sales and are therefore processed outside of the Point Of Sale program. These transactions are an integral part of balancing your books. The different types of these transactions are:
Deposits - the amount of cash and checks being deposited into your bank account. Deposits are entered as many times as necessary throughout each day.
Paid Outs - a type of transaction where you are paying out cash that would otherwise be included in your deposit. You may enter as many Paid Outs as necessary for any given date. Examples of paid outs might be: to a vendor or perhaps a store for supplies.
Paid Ins - a type of transaction where you are receiving money for something other than product sales. You may enter as many Paid Ins as necessary for any given date. There is not tax applied to these transactions. An example of a paid in might be a payment on a house account.
Gift Certificate Sales - this type of transaction is similar to a Paid In, there is no sale taking place. You do not pay tax on this transaction. You are simply holding money for someone. You will pay sales tax on the product sale when the gift certificate is redeemed. You will receive the gift certificate as a media. You may enter as many gift certificate sales as necessary for any given date.
Refunds - this type of transaction is similar to a Paid Out. It falls into it’s own category for reporting purposes. You are paying out cash to a customer after the sale has been processed and product has been consumed. Do not perform an overring for this amount. Overrings are only to be performed when an item has been rung up and inventory has NOT been consumed. Once an item has been used from inventory, you should not perform overrings. You may enter as many refunds as necessary for any given date.
Credit Card Settlements – the amounts and types of the credit card transactions being sent to the bank through your electronic or manual credit card processing devices.
Gift Certificates Redeemed – you will enter your gift certificates redeemed here to avoid employees making mistakes by improperly applying the incorrect media. Enter these transactions once you have verified the actual gift certificates redeemed.
Each of these transactions are entered the same way. To process a cash transaction, select the type of transaction you wish to perform from the Maintain menu. This will bring up a screen that displays a list of all "unposted" transactions of the type selected. An "unposted" transaction is one that can be changed and will not show up on any historical reports. A transaction must be posted before historical reports will reflect it’s effect. If you need to change information already posted, you can enter an adjusting transaction for the date in question. You may not change the posted information.
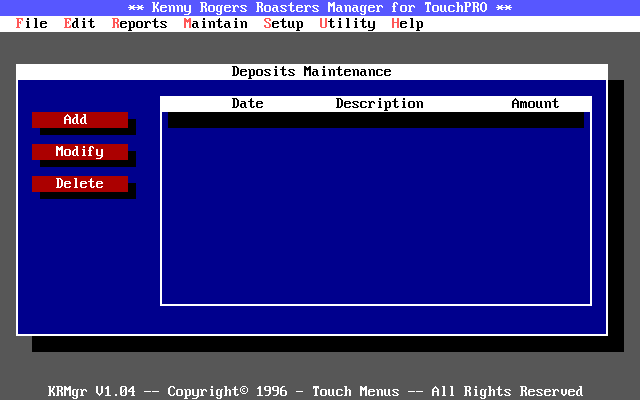
This screen provides you with the controls necessary to add a new transaction, modify an existing "unposted" transaction, delete an "unposted" transaction, generate a report including all "unposted" transactions of the type selected and post the "unposted" transactions for historical reporting.
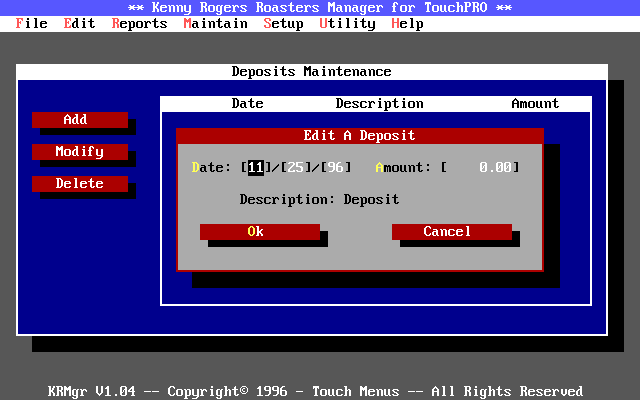
Add - Use this function to add a new "unposted" transaction of the currently selected type to the list. Pressing the INSERT key will bring up a screen where you can enter a date, an amount and a description. (the description field is already filled in for Deposits, Refunds and Gift Certificate sales)
Modify - Use this function to modify a "unposted" transaction on the list. Pressing the ENTER key will bring up a screen where you can change the amount or description.
Delete - Use this function to delete an "unposted" transaction from the list.
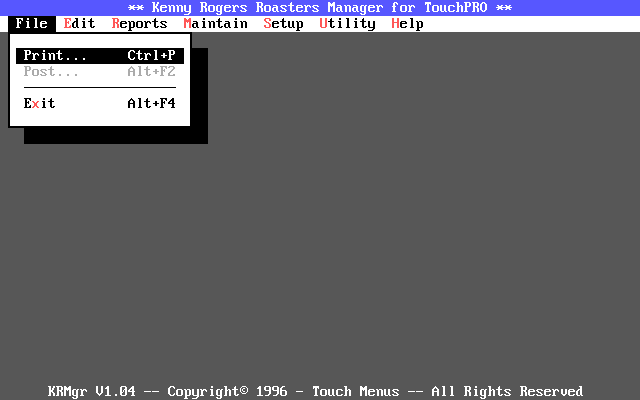
Print - Use this function to generate a report of all the "unposted" transactions of the currently selected type. You will be able to view or print the report. To do this, access the File menu by pressing Alt+F. This will display the File menu, next select Print.
Post - Use this function to post all the "unposted" transactions listed on the screen. To do this, access the File menu by pressing Alt+F. This will display the File menu, next select Post.
Overview
The tracking of purchases is designed to be done here. Purchases may or may not be Paid Outs. One has nothing to do with the other. You should enter the required information for each purchase you make and the corporate office will then be able to review your individual purchases. This function works in conjunction with the Purchases Log function accessed through the Utility menu.
To enter a purchase, select Unposted Purchases from the Maintenance menu.
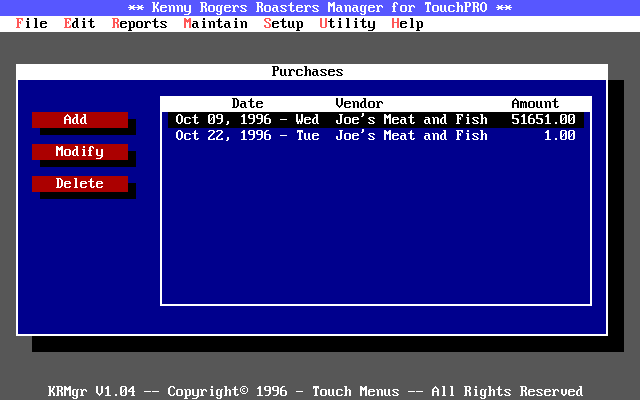
This screen provides you with the controls necessary to add a new purchase, modify an existing "unposted" purchase, delete an "unposted" purchase, generate a report including all "unposted" purchases and post the "unposted" purchases for historical reporting.
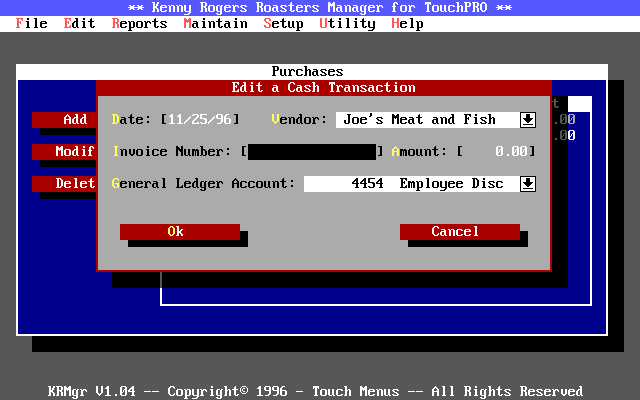
Add - Use this function to add a new "unposted" purchase to the list. Pressing the INSERT key will bring up a screen where you can enter a date, a vendor, an invoice number, an amount and a general ledger account.
Modify - Use this function to modify a "unposted"
purchase on the list. Pressing the ENTER key will bring up a screen where you can change
the date, vendor, invoice number, amount or general ledger account.
NOTE: This screen makes use of an user interface element called a combo box. The
combo box is a white box with a down arrow on the right side of it. This box will expand
when selected. See User Interface Fundamentals section for a detailed description
of a combo box.
Delete - Use this function to delete an "unposted" purchase from the list.

Print - Use this function to generate a report of all the "unposted" purchases. You will be able to view or print the report. To do this, access the File menu by pressing Alt+F. This will display the File menu, next select Print.
Post - Use this function to post all the "unposted" purchases listed on the screen. To do this, access the File menu by pressing Alt+F. This will display the File menu, next select Post.
Overview
The Roaster Production Items are the inventory items that will be included on the Roaster Production Report. You may include up to six inventory items to appear on this report. This report is designed to make it easier for you to gauge how much product you should have on the roaster at any given time. You can run this report at any time throughout the day. It works by showing you the average hourly sales and average hourly theoretical usage for each of the items selected. The sales and theoretical usage information is gathered from the past four weeks of the current day. For example, if you run the report on a Friday, the report will look at the past four Fridays for sales information.
To enter a maintain the list of items included on this Report, select Roaster Production Items from the Maintenance menu.
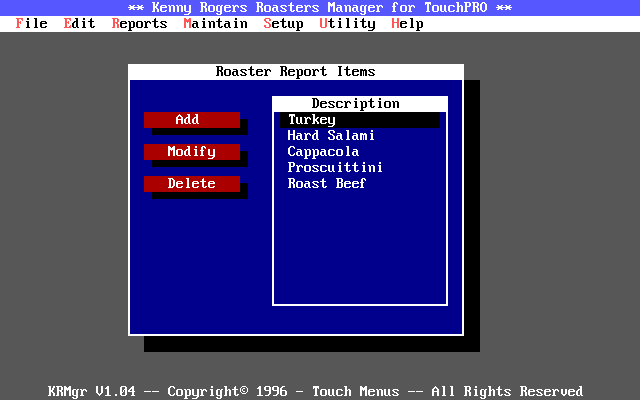
This screen provides you with the controls necessary to add a new inventory item, modify an existing inventory item, delete an inventory item and generate a report showing all including inventory items.
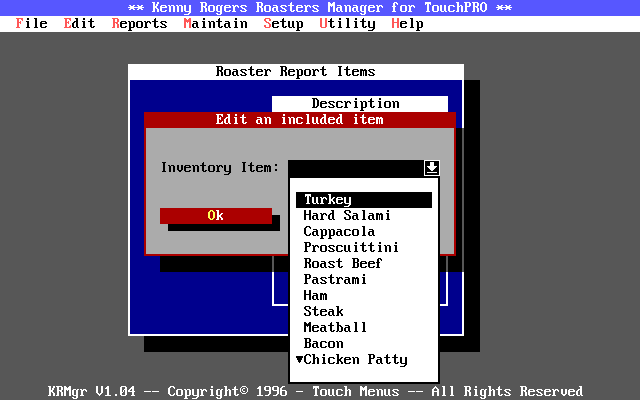
Add - Use this function to add a new inventory item to the list. Pressing the INSERT key will bring up a screen where you can select an inventory item from the combo box.
Modify - Use this function to modify an existing inventory
item. Pressing the ENTER key will bring up a screen where you can change the inventory
item.
NOTE: This screen makes use of an user interface element called a combo box. The
combo box is a white box with a down arrow on the right side of it. This box will expand
when selected. See User Interface Fundamentals section for a detailed description
of a combo box.
Delete - Use this function to delete an inventory item from the list.

Print - Use this function to generate a report of all the included inventory items. You will be able to view or print the report. To do this, access the File menu by pressing Alt+F. This will display the File menu, next select Print.
Overview
The Sides Production Items are the inventory items that will be included on the Sides Production Report. You may include up to one hundred inventory items to appear on this report. This report will show you the quantity of each side item to produce for the day. This is done by entering an on hand quantity for each item and then running the report. The report uses a "PAR" figure that is computed by looking at the past four occurrences of the current day for sales information. The amount to produce is the difference between the on hand quantity and the computed "PAR" figure.
You will use this function to maintain the list of items included on the report and also to enter the on hand amounts of the items on the report.
To run a Sides Production Report you will have to:
- Create a list of inventory items to be included on the list.
- Enter the on hand quantities each morning. You will do this by printing a count sheet, counting the items and then entering the count here.
- Run the report.
To maintain these items, select Sides Production Items from the Maintenance menu.
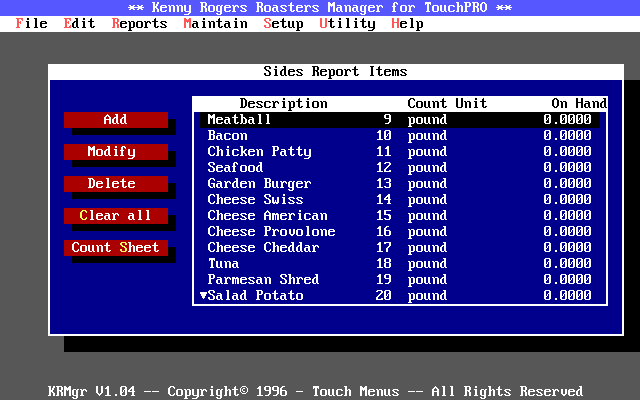
This screen provides you with the controls necessary to add a new inventory item, modify an existing inventory item, delete an inventory item, generate a report showing all including inventory items, enter on hand counts for an inventory item, print a count sheet and clear all on hand counts.
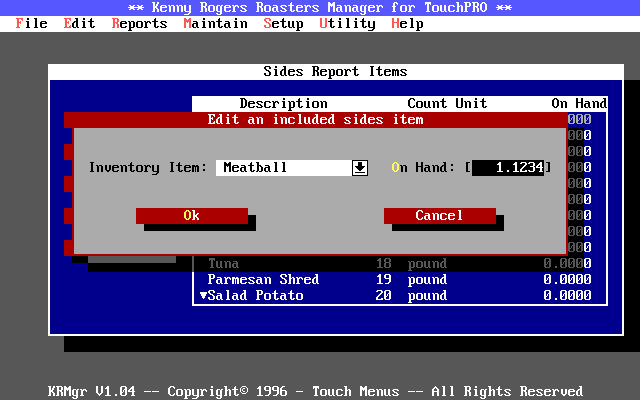
Add - Use this function to add a new inventory item to the list. Pressing the INSERT key will bring up a screen where you can select an inventory item from the combo box. You can also enter an on hand quantity at this time if you wish.
Modify - Use this function to modify an existing inventory
item. Pressing the ENTER key will bring up a screen where you can change the inventory
item. This function will mostly be used for entering on hand quantities each morning.
Simply highlight the item you wish to enter a count for and press the ENTER key. Then
enter the on hand quantity and press the OK button.
NOTE: This screen makes use of an user interface element called a combo box. The
combo box is a white box with a down arrow on the right side of it. This box will expand
when selected. See User Interface Fundamentals section for a detailed description
of a combo box.
Delete - Use this function to delete an inventory item from the list.
Clear All - Use this function to clear all on hand quantities.
Count Sheet - Use this function to print a count sheet for gathering the on hand quantities of the inventory items to be included on the Sides Production Report.

Print - Use this function to generate a report of all the included inventory items and their on hand quantities. You will be able to view or print the report. To do this, access the File menu by pressing Alt+F. This will display the File menu, next select Print.
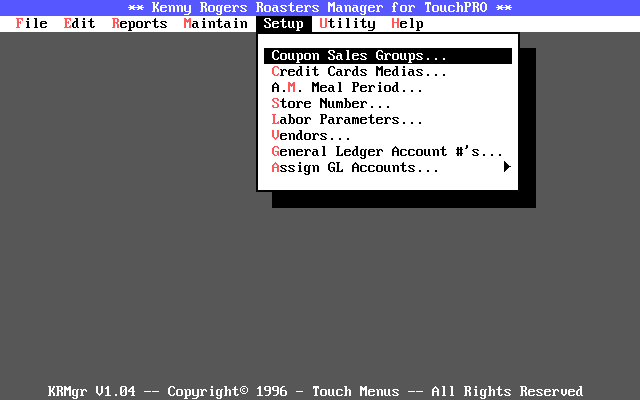
The Setup Menu is used to define parameters for use in the Export to Accounting and the Unposted Purchases and the Purchases Log. The Export to Accounting function is used by your corporate office to create a consolidated summary of your sales, labor and inventory information for importing into a third party program. The Purchases Log is also used by your corporate office to import your purchases information into a third party program.
From the Setup Menu you can choose the following:
- Coupon Sales Groups - for defining which sales groups are considered to be "Coupons".
- Credit Card Media - for defining which media are considered "Credit Cards".
- A.M. Meal Period - for defining your A.M. Meal Period.
- Store Number - for defining your Store Number.
- Labor Parameters - for defining overtime labor parameters.
- Vendors - for maintaining a list of vendors.
- General Ledger Account #s - for maintaining a list of General Ledger Account Numbers.
- Assign GL Accounts - for assigning General Ledger Accounts to individual categories of information included on the Export to Accounting.
The Coupon Sales Groups setup is used to define which sales groups are considered "Coupons". This information is necessary for a Coupon Count figure on the Export to Accounting. Each time a PLU is sold that belongs to one of the groups on this list, it will be counted as a "Coupon". It is important that you set this list up correctly and that all PLUs are assigned to their proper sales groups.
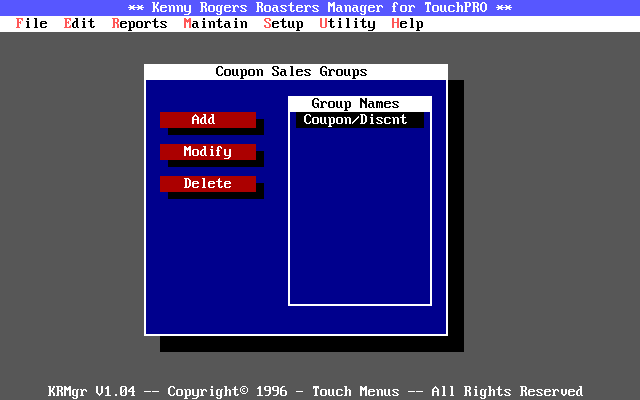
This screen provides you with the controls necessary to add a sales group, modify an existing sales group, delete a sales group and generate a report showing all sales groups considered to be "Coupon Sales Groups".
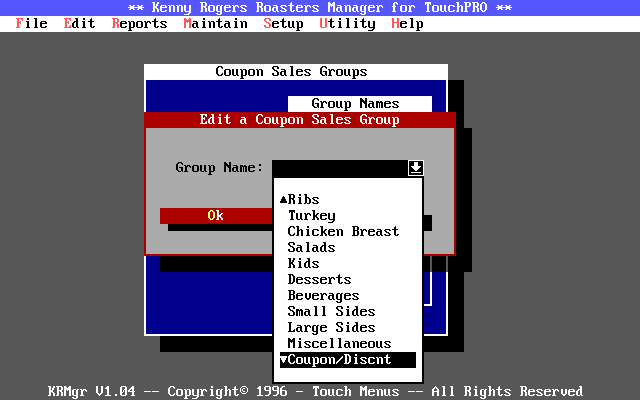
Add - Use this function to add a new sales group to the list. Pressing the INSERT key will bring up a screen where you can select a sales group from the combo box.
Modify - Use this function to modify an existing sales
group. Pressing the ENTER key will bring up a screen where you can change the sales group.
Simply highlight the item you wish to modify and press the ENTER key.
NOTE: This screen makes use of an user interface element called a combo box. The
combo box is a white box with a down arrow on the right side of it. This box will expand
when selected. See User Interface Fundamentals section for a detailed description
of a combo box.
Delete - Use this function to delete a sales group from the list.

Print - Use this function to generate a report of all the sales groups considered to be "Coupon Sales Groups". You will be able to view or print the report. To do this, access the File menu by pressing Alt+F. This will display the File menu, next select Print.
The Credit Card Media setup is used to define which media are considered to be "Credit Cards". This information is necessary for the Export to Accounting and for performing Credit Card Settlements.
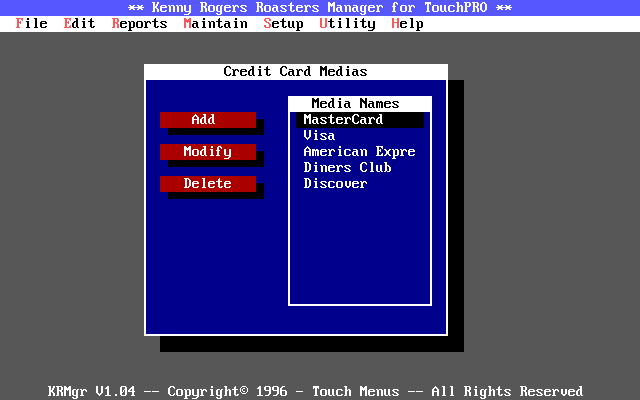
This screen provides you with the controls necessary to add a media, modify an existing media, delete a media and generate a report showing all media considered to be "Credit Cards".
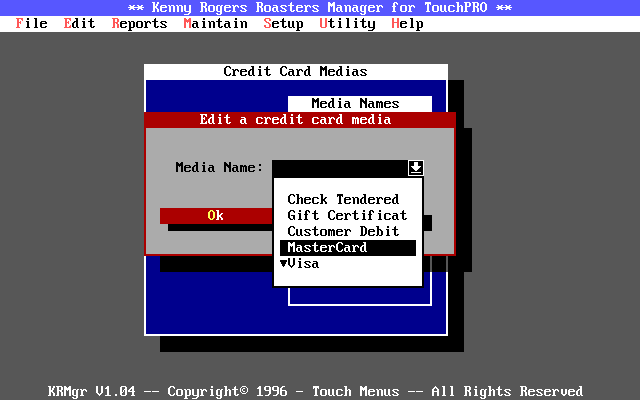
Add - Use this function to add a new media to the list. Pressing the INSERT key will bring up a screen where you can select a media from the combo box.
Modify - Use this function to modify an existing media.
Pressing the ENTER key will bring up a screen where you can change the media. Simply
highlight the item you wish to modify and press the ENTER key.
NOTE: This screen makes use of an user interface element called a combo box. The
combo box is a white box with a down arrow on the right side of it. This box will expand
when selected. See User Interface Fundamentals section for a detailed description
of a combo box.
Delete - Use this function to delete a media from the list.

Print - Use this function to generate a report of all the media considered to be "Credit Cards". You will be able to view or print the report. To do this, access the File menu by pressing Alt+F. This will display the File menu, next select Print.
The A.M. Meal Period setup is used to define which hours of the day are considered to be your A.M. Meal Period. All sales within this range of time will be reported as A.M. Sales on the Export to Accounting.
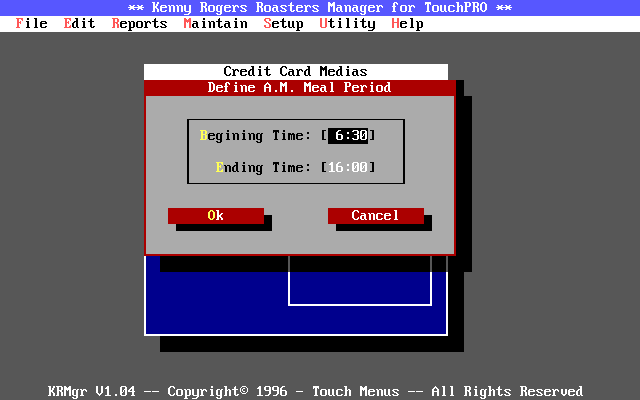
This screen provides you with the controls necessary to change the hours associated with defining your A.M. Meal Period.
Enter a beginning time and an ending time.
These times are military time.
The Store Number setup is used to define your individual store number for the Export to Accounting.
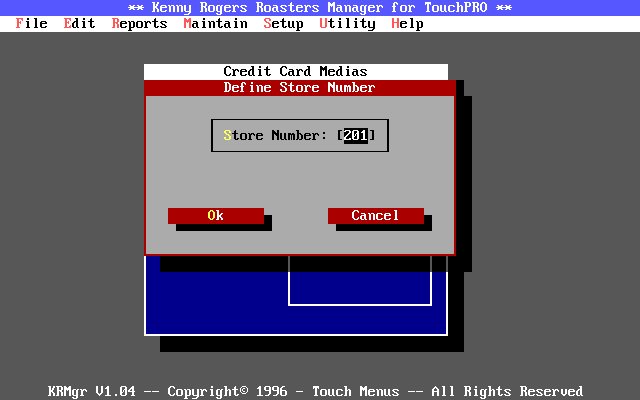
This screen provides you with the controls necessary to change the store number.
The Labor Parameters setup is used to define your overtime labor parameters for the Export to Accounting. The parameters respected are:
- Hours per week before considered to be on overtime.
- Overtime rate of pay multiplier
- Day of Week your week begins on. This is hard coded to Monday.
This screen provides you with the controls necessary to change the labor parameters. Enter the hours per week and the overtime rate of pay multiplier.
The Vendor Maintenance setup is used to define and maintain a list of vendors. This list will be used when entering your purchases for the Purchase Log.
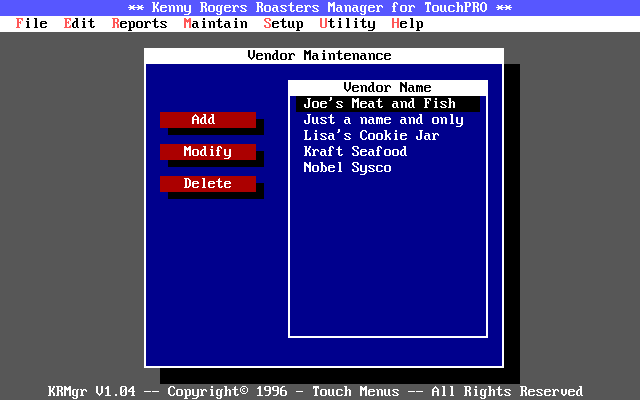
This screen provides you with the controls necessary to add a vendor, modify an existing vendor, delete a vendor and generate a report showing all vendors.
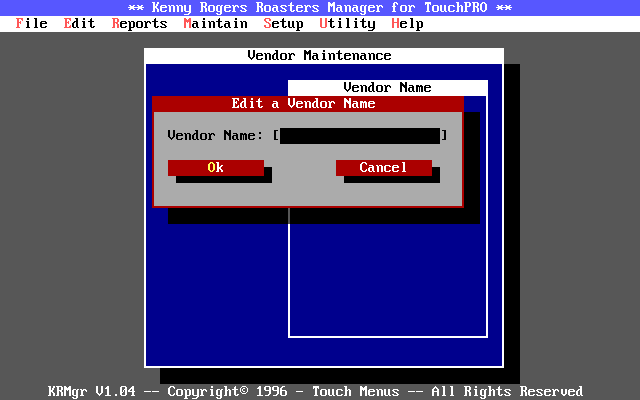
Add - Use this function to add a new vendor to the list. Pressing the INSERT key will bring up a screen where you can type a name for the vendor.
Modify - Use this function to modify an existing vendor.
Pressing the ENTER key will bring up a screen where you can vendor’s name. Simply
highlight the item you wish to modify and press the ENTER key.
NOTE: This screen makes use of an user interface element called a combo box. The
combo box is a white box with a down arrow on the right side of it. This box will expand
when selected. See User Interface Fundamentals section for a detailed description
of a combo box.
Delete - Use this function to delete a vendor from the list.

Print - Use this function to generate a report of all the vendors. You will be able to view or print the report. To do this, access the File menu by pressing Alt+F. This will display the File menu, next select Print.
General Ledger Account Maintenance
The General Ledger Account Maintenance setup is used to maintain and define your General Ledger Accounts. Each General Ledger account consists of a number, a description, and an effect (debit or credit). These accounts are used for the Purchases Log and the Export to Accounting.
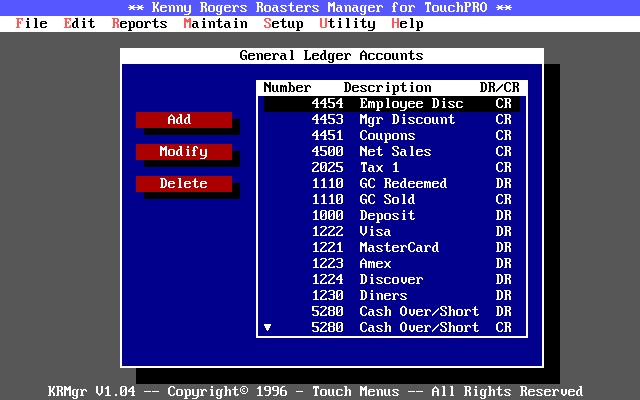
This screen provides you with the controls necessary to add a general ledger account, modify an existing general ledger account, delete a general ledger account and generate a report showing all general ledger accounts.
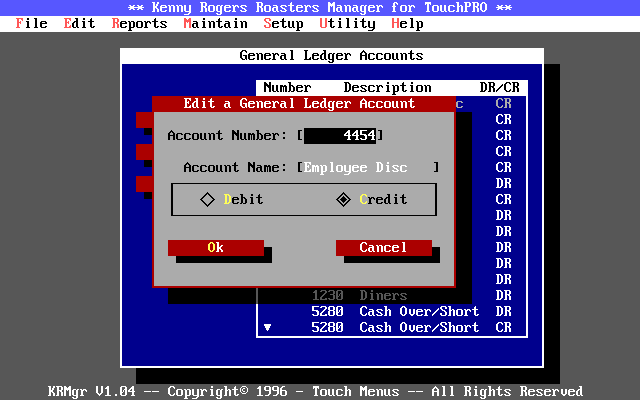
Add - Use this function to add a new general ledger account to the list. Pressing the INSERT key will bring up a screen where you can type a number and a name for the account as well as an effect (Debit or Credit)
Modify - Use this function to modify an existing general
ledger account. Pressing the ENTER key will bring up a screen where you can change the
account’s name, number or effect. Simply highlight the item you wish to modify and
press the ENTER key.
NOTE: This screen makes use of an user interface element called a combo box. The
combo box is a white box with a down arrow on the right side of it. This box will expand
when selected. See User Interface Fundamentals section for a detailed description
of a combo box.
Delete - Use this function to delete an account from the list.

Print - Use this function to generate a report of all the vendors. You will be able to view or print the report. To do this, access the File menu by pressing Alt+F. This will display the File menu, next select Print.
Assigning General Ledger Accounts Menu
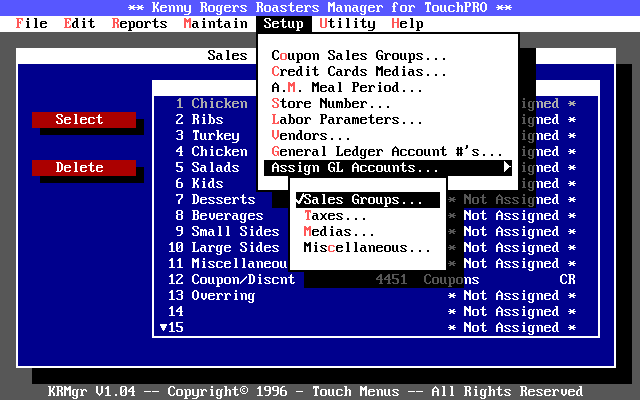
The Assign GL Account menu is used to assign General Ledger account to the different types of information found in the Export to Accounting function. From this menu you will be able to assign General Ledger accounts to:
- Sales Groups - the sales groups are used in the section where all negative sales are reported. These sales are reported by sales group, therefore you will need to assign a General Ledger account number to each sales group you expect to see in this section. For example you may have a sales group called Coupon/Discount which all PLUs used for coupons or discounts are assigned to. You would need to assign this sales group a General Ledger account number. If a sales group is reported on, but has no account number assigned, the account number will just be blank.
- Taxes - up to four different tax rates will be reported on. You will need to assign a General Ledger account number to each rate you expect to be used.
- Medias - The only media reported on are the "credit card" media (as defined by you). You will need to assign an account number for each "credit card" media.
- Miscellaneous - There are several hard coded lines in the Accounting export file that can not be defined by you. Use this menu selection to assign an account number to these categories. Some of these are: Gross Sales, Net Sales, Cash Over/Short, Refunds, etc.
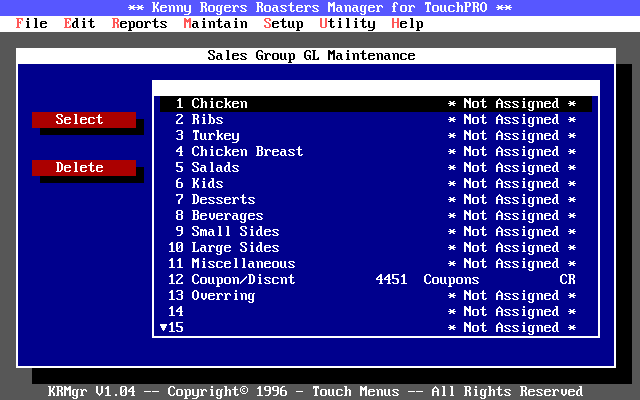
This screen provides you with the controls necessary to assign a general ledger account to a line item. Assigning an account number for any of the types of line items above will function the same. You will select Select to assign a new general ledger account and Delete to delete the assignment. (Not the line item)
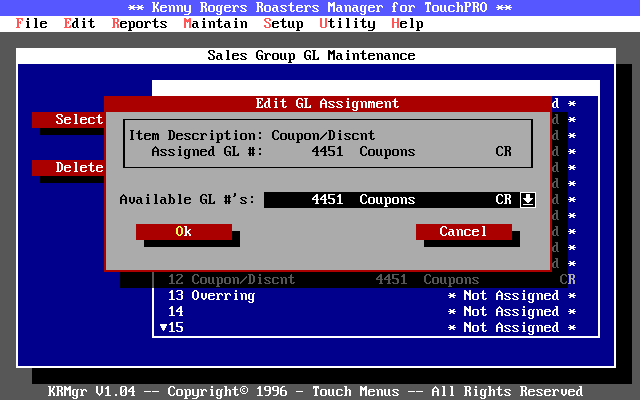
Select - Use this function to assign a new general ledger account number to the currently selected line item. Press ENTER to bring up a screen where you will be able to select a general ledger account from a combo box populated with the general ledger accounts you have previously defined.
NOTE: This screen makes use of an user interface element called a combo box. The
combo box is a white box with a down arrow on the right side of it. This box will expand
when selected. See User Interface Fundamentals section for a detailed description
of a combo box.
Delete - Use this function to delete an account assignment for the currently selected line item. If the item was assigned an account it will change to * Not Assigned *.

Print - Use this function to generate a report of all the general ledger assignments for the currently selected category. You will be able to view or print the report. To do this, access the File menu by pressing Alt+F. This will display the File menu, next select Print.
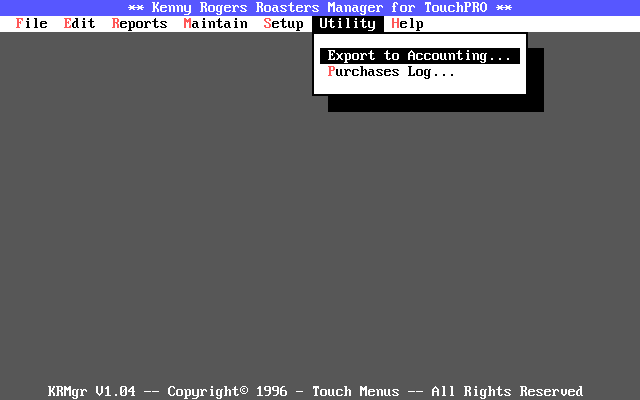
The Utility Menu is for use by the corporate office. From this menu you can choose:
- Export to Accounting - for generating an ASCII comma delimited file for importing into a third party program. This file is created in a proprietary format specified by your corporate office. This file contains labor, sales and media information.
- Purchases Log - for generating an ASCII comma delimited file for importing into a third party program. This file contains purchase information as entered by using the Unposted Purchases function in the Maintain menu.
The Export to Accounting function is designed to create an ASCII comma delimited file for importing into a third party program. (like a spreadsheet program) It’s specifications were designed in conjunction with the Vancouver Kenny Rogers franchise corporate office.
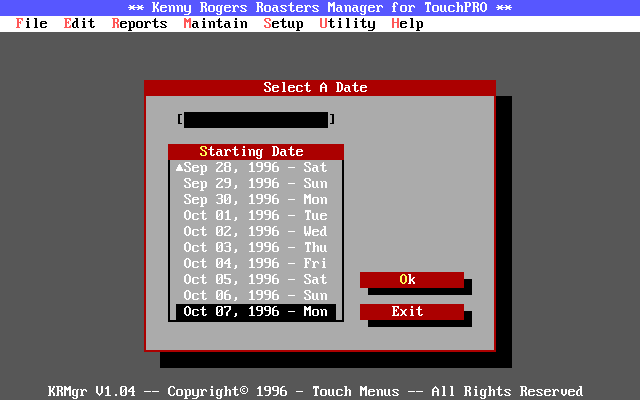
To run the export, select Export to Accounting from the Utility menu. This will bring up a screen where you will select the beginning day for the export. The export file will include up to seven days in it.
Select the beginning date from the list and then choose Ok to generate the file. This will create a file named YYMMDD.EXP in the directory where this program is running from. The YYMMDD will be the date you selected for the beginning date. For example if you selected Sep 30, 1996 for the beginning date, the file created would be 960930.EXP.
An example of an export file is included in the Examples of Reports section.
The Purchases Log function is designed to create an ASCII comma delimited file for importing into a third party program. (like a spreadsheet program) It’s specifications were designed in conjunction with the Vancouver Kenny Rogers franchise corporate office.
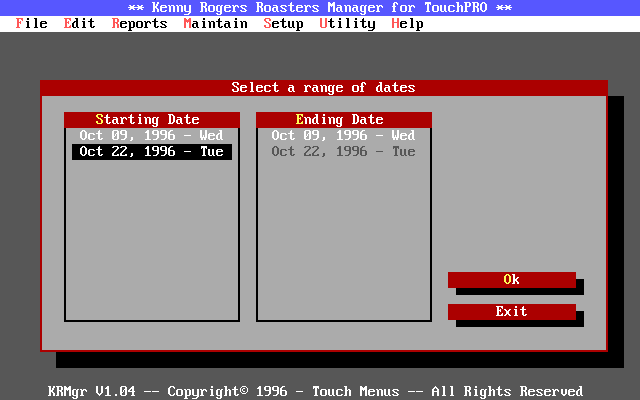
To run the export, select Purchases Log from the Utility menu. This will bring up a screen where you will select the beginning and ending days for the export.
Select the beginning and ending dates from the lists and then choose Ok to generate the file. This will create a file named Purchase.LOG in the directory where this program is running from.
An example of an export file is included in the Examples of Reports section.
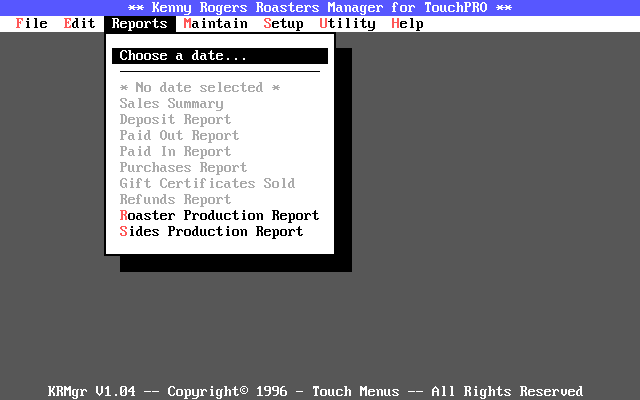
The Reports Menu is used to run the different reports. Most of the reports require that you select a date or range of dates before running. When no dates are selected, the reports requiring this information will be grayed out like the example above. Notice that there are two exceptions to this rule. The Roaster and Sides Production Reports do not need a date selected to run. This is because these reports are assumed to be run for the current date.
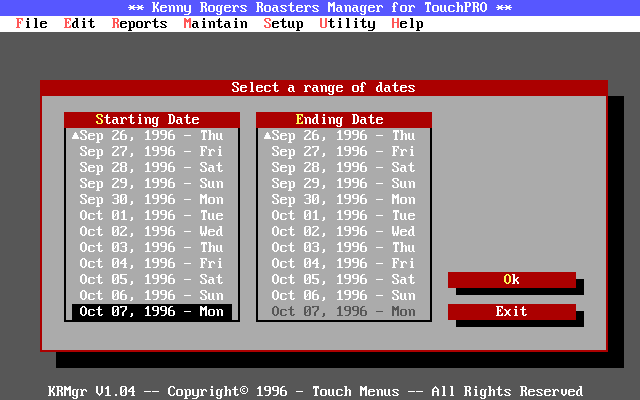
Select a date by highlighting Choose a Date on the Reports Menu and pressing ENTER. This will bring up a screen where you will be able to select from a range of dates. Select a beginning date and an ending date and select Ok. After selecting a range of dates, all reports will be ungrayed from the menu and you will be able to run any of the reports.
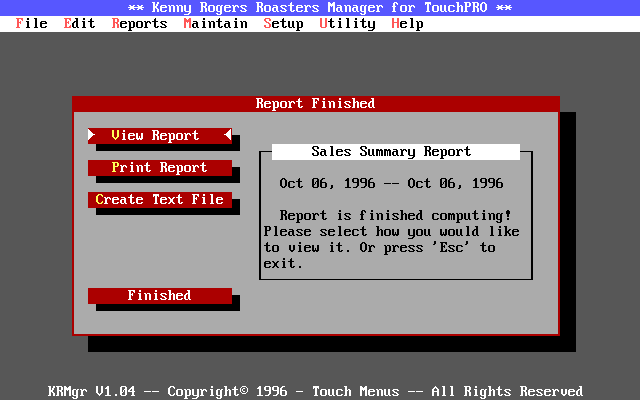
Once a report has been generated you will be presented with a screen showing you available report output options. You can View, Print or Create a Text file with the report. If you choose Create a Text file, you will be able to type in the name of the file to create and a text file will be created with the generated report in the current directory. This file can then be imported into a third party program.
Export to Accounting File
| Description | Date 1 |
Date 2 |
Date 3 |
Date 4 |
Date 5 |
Date 6 |
Date 7 |
G.L. Acct | Store # | Totals | |||||||||||
| Description | 960930 |
961001 |
961002 |
961003 |
961004 |
961005 |
961006 |
Acct# | Num | Totals | |||||||||||
| Refunds | 0 |
0 |
0 |
0 |
0 |
0 |
0 |
0 |
201 |
0 |
|||||||||||
| Gross Sales | 1507.42 |
1335.14 |
1408.26 |
1668.37 |
2011.8 |
2083.89 |
1604.97 |
5901 |
201 |
11619.85 |
CR | ||||||||||
| - Coupon/Discnt | -257.78 |
-121.75 |
-122.18 |
-137.31 |
-155.23 |
-138.59 |
-113.54 |
4451 |
201 |
-1046.38 |
CR | ||||||||||
| - | 0 |
0 |
-5 |
0 |
0 |
0 |
0 |
0 |
201 |
-5 |
|||||||||||
| = Net Sales | 1249.64 |
1213.39 |
1278.58 |
1531.06 |
1856.57 |
1945.3 |
1491.43 |
4500 |
201 |
10565.97 |
CR | ||||||||||
| + Tax 1 | 0 |
0 |
0 |
0 |
0 |
0 |
0 |
2025 |
201 |
0 |
CR | ||||||||||
| + Tax 2 | 0 |
0 |
0 |
0 |
0 |
0 |
0 |
0 |
201 |
0 |
|||||||||||
| + Tax 3 | 0 |
0 |
0 |
0 |
0 |
0 |
0 |
0 |
201 |
0 |
|||||||||||
| + Tax 4 | 0 |
0 |
0 |
0 |
0 |
0 |
0 |
0 |
201 |
0 |
|||||||||||
| = Gross Receipts | 1249.64 |
1213.39 |
1278.58 |
1531.06 |
1856.57 |
1945.3 |
1491.43 |
0 |
201 |
10565.97 |
|||||||||||
| - Paid Outs | 0 |
0 |
0 |
45 |
36.4 |
0 |
0 |
0 |
201 |
81.4 |
|||||||||||
| - GC Redeemed | 0 |
0 |
0 |
0 |
0 |
0 |
0 |
1110 |
201 |
0 |
DR | ||||||||||
| + GC Sold | 0 |
0 |
0 |
0 |
0 |
0 |
0 |
1110 |
201 |
0 |
CR | ||||||||||
| + Paid In | 0 |
0 |
0 |
0 |
0 |
0 |
0 |
0 |
201 |
0 |
|||||||||||
| - Credit Cards | 181.56 |
154.89 |
213.08 |
274.61 |
422.12 |
277.82 |
274.81 |
0 |
201 |
1798.89 |
|||||||||||
| =Expected Deposit | 1068.08 |
1058.5 |
1065.5 |
1211.45 |
1398.05 |
1667.48 |
1216.62 |
0 |
201 |
8685.68 |
|||||||||||
| - Deposit # 1 | 372.1 |
336.8 |
439.1 |
466 |
454.72 |
511.44 |
488.22 |
0 |
201 |
3068.38 |
|||||||||||
| - Deposit # 2 | 692.98 |
366.8 |
573.7 |
682.08 |
894.29 |
1117.9 |
728.06 |
0 |
201 |
5055.81 |
|||||||||||
| - Deposit # 3 | 0 |
-336.8 |
0 |
-682.08 |
0 |
0 |
0 |
0 |
201 |
-1018.88 |
|||||||||||
| - Deposit # 4 | 0 |
693.14 |
0 |
662.08 |
0 |
0 |
0 |
0 |
201 |
1355.22 |
|||||||||||
| - Total Deposits | 1065.08 |
1059.94 |
1012.8 |
1128.08 |
1349.01 |
1629.34 |
1216.28 |
1000 |
201 |
8460.53 |
DR | ||||||||||
| = Cash Over/Short | -3 |
1.44 |
-52.7 |
-83.37 |
-49.04 |
-38.14 |
-0.34 |
5280 |
201 |
-225.15 |
DR | ||||||||||
| MasterCard | 6.95 |
9.97 |
17.22 |
28.03 |
71.97 |
66.12 |
34.4 |
1222 |
201 |
234.66 |
DR | ||||||||||
| Visa | 159.9 |
94.99 |
160.45 |
187.09 |
282.65 |
198.74 |
211.96 |
1221 |
201 |
1295.78 |
DR | ||||||||||
| American Express | 14.71 |
49.93 |
21.46 |
48.93 |
6.98 |
12.96 |
6.97 |
1224 |
201 |
161.94 |
DR | ||||||||||
| Diners Club | 0 |
0 |
0 |
0 |
0 |
0 |
0 |
1230 |
201 |
0 |
DR | ||||||||||
| Discover | 0 |
0 |
13.95 |
10.56 |
60.52 |
0 |
21.48 |
0 |
201 |
106.51 |
|||||||||||
| Labor Hours | 62.49 |
63.21 |
60.04 |
67.25 |
72.98 |
64.42 |
69.11 |
0 |
201 |
459.5 |
|||||||||||
| Labor Dollars | 374.73 |
379.3 |
368.3 |
402.77 |
443.14 |
405.04 |
435.28 |
0 |
201 |
2808.54 |
|||||||||||
| Labor$/Net Sales | 29.99 |
31.26 |
28.81 |
26.31 |
23.87 |
20.82 |
29.19 |
0 |
201 |
2658.1 |
|||||||||||
| Coupon Count | 109 |
34 |
43 |
36 |
45 |
44 |
38 |
0 |
201 |
349 |
|||||||||||
| Transaction Count | 156 |
150 |
145 |
162 |
187 |
179 |
143 |
0 |
201 |
1122 |
|||||||||||
| Avg Transaction | 8.01 |
8.09 |
8.82 |
9.45 |
9.93 |
10.87 |
10.43 |
0 |
201 |
9.42 |
|||||||||||
| HERE Guest Cnt | 78 |
67 |
63 |
85 |
97 |
98 |
92 |
0 |
201 |
580 |
|||||||||||
| Avg HERE Check | 7.63 |
7.55 |
7.68 |
8.39 |
7.35 |
10.87 |
10.24 |
0 |
201 |
8.9 |
|||||||||||
| DRIVE Guest Cnt | 46 |
52 |
41 |
48 |
60 |
53 |
37 |
0 |
201 |
337 |
|||||||||||
| Avg DRIVE Check | 7.42 |
8.46 |
8.8 |
10.87 |
8.7 |
10.44 |
10.13 |
0 |
201 |
9.49 |
|||||||||||
| TOGO Guest Cnt | 32 |
31 |
41 |
29 |
30 |
28 |
14 |
0 |
201 |
205 |
|||||||||||
| Avg TOGO Check | 9.79 |
8.64 |
10.59 |
10.2 |
9.86 |
11.66 |
12.43 |
0 |
201 |
10.77 |
|||||||||||
| A.M. Sales | 388.4 |
397.77 |
382.9 |
423.14 |
492.38 |
546.91 |
642.44 |
0 |
201 |
3273.94 |
|||||||||||
| HERE | 594.87 |
505.81 |
483.62 |
713.14 |
855.26 |
1065.31 |
942.5 |
0 |
201 |
5160.51 |
|||||||||||
| DRIVE | 341.51 |
439.86 |
360.96 |
521.98 |
605.48 |
553.47 |
374.96 |
0 |
201 |
3198.22 |
|||||||||||
| TOGO | 313.26 |
267.72 |
434 |
295.94 |
395.83 |
326.52 |
173.97 |
0 |
201 |
2207.24 |
|||||||||||
| = Net Sales | 1249.64 |
1213.39 |
1278.58 |
1531.06 |
1856.57 |
1945.3 |
1491.43 |
4500 |
201 |
10565.97 |
CR | ||||||||||
| Last Week Sales | 1188.64 |
1428.76 |
1551.65 |
1487.83 |
2003.1 |
1867.67 |
1917.12 |
0 |
201 |
11444.77 |
|||||||||||
| Sales Variance | 61 |
-215.37 |
-273.07 |
43.23 |
-146.53 |
77.63 |
-425.69 |
0 |
201 |
-878.8 |
|||||||||||
Purchases Log File
Date |
General Ledger Account | Store # |
Description |
Vendor |
Amount |
961009 |
5901 Gross Sales CR | 201 |
abcdefghijklmnop | Lisa's Cookie Jar | 99999.99 |